Previous: Planning / Preparing servers Next: Installing KVM
The plan is to use 10.0.4.0/24 for the public network and 10.0.5.0/24 for the cluster network.
DNS Entries updated as follows
10.0.4.1 ceph1
10.0.4.2 ceph2
10.0.4.3 ceph3
10.0.4.4 ceph4
10.0.5.1 csync1
10.0.5.2 csync2
10.0.5.3 csync3
10.0.5.3 csync4
As part of planning and preparing servers, we enabled passwordless, key-based SSH access between servers, a prerequisite for ceph installation.
Add the ceph repository
wget -q -O- 'https://download.ceph.com/keys/release.asc' | apt-key add -
apt-add-repository 'deb https://download.ceph.com/debian-reef/ bookworm main'
apt -y update
apt -y upgrade
Install Ceph on all servers and remove cephadm (not using it), numactl for CPU pinning of OSD services.
apt -y install ceph python3-packaging numactl libhugetlbfs-bin libhugetlbfs0
apt remove --purge cephadm
apt reinstall python3-cryptography
apt reinstall ceph-mgr
Log in (SSH) into node ceph1 (first node)
Generate a unique uuid for FS.
uuidgen

b115cfad-cce9-4404-a9eb-e821e856bbfd
Create a ceph configuration file /etc/ceph/ceph.conf (with only one monitor node to start with)
[global]
cluster_network = 10.0.5.0/24
public_network = 10.0.4.0/24
fsid = 577c09c2-c514-471a-aee1-6a0f56c83c3a
mon host = 10.0.4.1
mon initial members = ceph1

[mon]
mon allow pool delete = false
mon_max_pg_per_osd = 128

[mon.ceph1]
host = ceph1
mon addr = 10.0.4.1
[mon.ceph2]
host = ceph2
mon addr = 10.0.4.2
[mon.ceph3]
host = ceph3
mon addr = 10.0.4.3

[client]
rbd_cache = true
rbd_cache_writethrough_until_flush = true
rbd_cache_size = 402653184
rbd_cache_max_dirty = 301989888
rbd_cache_max_dirty_age = 10
rbd_op_threads = 8

[osd]
osd crush update on start = true
bluestore_rocksdb_options = "allow_mmap_reads=false,allow_mmap_writes=false,use_direct_reads=true,use_direct_io_for_flush_and_compaction=true,write_buffer_size=268435456,max_write_buffer_number=4,min_write_buffer_number_to_merge=1,compression=kNoCompression,level_compaction_dynamic_level_bytes=true,target_file_size_base=134217728,max_bytes_for_level_base=536870912"
osd_memory_target = 8G
mon_osd_down_out_interval = 180
osd_op_threads = 6
bluestore_cache_size = 4G
Notes on configurations
Monitor
mon allow pool delete = false   -> A safety lock to prevent the accidental deletion of storage pools.
mon_max_pg_per_osd = 128        -> Sets a limit on the maximum number of placement groups per OSD to ensure cluster stability.
mon_osd_down_out_interval = 180 -> Defines the grace period in seconds before a non-responsive OSD is marked 'out' of the cluster.
RBD
rbd_cache = true                          -> Enables a local memory cache on the client to accelerate block device read performance.
rbd_cache_writethrough_until_flush = true -> Improves data safety by writing to both the local cache and the main cluster simultaneously.
rbd_cache_size = 402653184                -> Allocates a total of 384 MiB of the client's memory for the block device cache
rbd_cache_max_dirty = 301989888           -> Limits the amount of un-flushed write data in the local cache to 288 MiB.
rbd_cache_max_dirty_age = 10              -> Automatically flushes cached writes to the cluster after 10 seconds to minimize data loss risk.
rbd_op_threads = 8                        -> Specifies the number of parallel threads on the client for handling block device I/O operations
OSD
osd crush update on start = true -> Forces the OSD to fetch the latest cluster map on startup to ensure correct data placement.
osd_memory_target = 8G -> Sets the total memory usage target for an OSD, allowing Ceph to automatically manage its internal caches.
osd_op_threads = 6  -> Defines the number of worker threads inside the OSD for processing client I/O and background tasks.
bluestore_cache_size = 4G -> Allocates a dedicated portion of the OSD's memory target specifically for the main BlueStore data and metadata cache

OSD -> Blue Store RocksDB Options

allow_mmap_reads=false                      -> Disables memory-mapped file reads to give Ceph more direct control over I/O.
allow_mmap_writes=false                     -> Disables memory-mapped file writes, ensuring data goes through Ceph's controlled I/O path.
use_direct_reads=true                       -> Forces all read operations to bypass the operating system's cache for more predictable performance.
use_direct_io_for_flush_and_compaction=true -> Uses direct I/O for background data flushing and compaction to avoid kernel caching overhead.
write_buffer_size=268435456                 -> Sets a 256MB in-memory buffer to absorb incoming writes before they are flushed to disk.
max_write_buffer_number=4                   -> Allows up to four write buffers to be held in memory simultaneously to better handle write bursts.
min_write_buffer_number_to_merge=1          -> Specifies that a write buffer can be merged as soon as it is flushed, optimizing data flow.
compression=kNoCompression                  -> Disables on-disk compression to reduce CPU usage at the cost of higher metadata storage space.
level_compaction_dynamic_level_bytes=true   -> Enables dynamic sizing for different data levels, improving overall space management.
target_file_size_base=134217728             -> Sets the base target size for individual data files (SSTs) on disk to 128MB.
max_bytes_for_level_base=536870912          -> Defines the total size of the base data level (L1) on disk to be 512MB.
Generate a monitor keyring
ceph-authtool --create-keyring /etc/ceph/ceph.mon.keyring --gen-key -n mon. --cap mon 'allow *'
Generate an administrator keyring, and generate a client.admin user and add the user to the keyring
ceph-authtool --create-keyring /etc/ceph/ceph.client.admin.keyring --gen-key -n client.admin --cap mon 'allow *' --cap osd 'allow *' --cap mds 'allow *' --cap mgr 'allow *'
Generate a bootstrap-osd keyring, and generate a client.bootstrap-osd user and add the user to the keyring
ceph-authtool --create-keyring /var/lib/ceph/bootstrap-osd/ceph.keyring --gen-key -n client.bootstrap-osd --cap mon 'profile bootstrap-osd' --cap mgr 'allow r'
Import generated keys
ceph-authtool /etc/ceph/ceph.mon.keyring --import-keyring /etc/ceph/ceph.client.admin.keyring
ceph-authtool /etc/ceph/ceph.mon.keyring --import-keyring /var/lib/ceph/bootstrap-osd/ceph.keyring
Generate a monitor map
FSID=$(grep "^fsid" /etc/ceph/ceph.conf | awk {'print $NF'})
monmaptool --create --add ceph1 10.0.4.1 --fsid $FSID /etc/ceph/monmap

Copy the generated map and configuration files to other nodes
scp /etc/ceph/* ceph2:/etc/ceph/
scp /etc/ceph/* ceph3:/etc/ceph/
scp /etc/ceph/* ceph4:/etc/ceph/
scp /var/lib/ceph/bootstrap-osd/ceph.keyring ceph2:/var/lib/ceph/bootstrap-osd
scp /var/lib/ceph/bootstrap-osd/ceph.keyring ceph3:/var/lib/ceph/bootstrap-osd
scp /var/lib/ceph/bootstrap-osd/ceph.keyring ceph4:/var/lib/ceph/bootstrap-osd
ssh ceph2 "chown ceph:ceph -R /etc/ceph /var/lib/ceph/bootstrap-osd/*"
ssh ceph3 "chown ceph:ceph -R /etc/ceph /var/lib/ceph/bootstrap-osd/*"
ssh ceph4 "chown ceph:ceph -R /etc/ceph /var/lib/ceph/bootstrap-osd/*"
Configure and enable the monitor daemon
- A default data directory on the monitor host
- Populate the monitor daemon with the monitor map and keyring
- Enable messenger v2 protocol
export NODENAME=ceph1
mkdir /var/lib/ceph/mon/ceph-$NODENAME
ceph-mon --cluster ceph --mkfs -i $NODENAME --monmap /etc/ceph/monmap --keyring /etc/ceph/ceph.mon.keyring
chown ceph:ceph /etc/ceph/ceph.*
chown -R ceph:ceph /var/lib/ceph/mon/ceph-$NODENAME /var/lib/ceph/bootstrap-osd
systemctl enable --now ceph-mon@$NODENAME
sleep 2
ceph mon enable-msgr2
ceph config set mon auth_allow_insecure_global_id_reclaim false
Create ceph volumes on all servers
Ceph OSD Metadata Layout: Dedicated SSDs for WAL and BLOCK DB
In our Ceph Reef deployment on Dell R630 nodes, we opted to use two dedicated enterprise SSDs per host for BlueStore metadata:
-
One SSD for WAL (Write-Ahead Log)
-
One SSD for RocksDB (Block DB)
Each is partitioned to serve multiple OSDs hosted on high-capacity NVMes and SSDs.
Key Reasons Behind This Design
1. Consistent Latency Performance (vs. NVMe)
While modern NVMe drives offer high peak performance, our tests showed that the SSDs backed by the Dell PERC H730P controller consistently outperformed consumer-grade NVMes in latency-critical FIO benchmarks, especially under sustained write pressure.
-
NVMe performance degraded under parallel writes.
-
H730P-backed SSDs delivered more stable IOPS and lower 99th percentile latencies
2. Controller Optimisation
-
The H730P RAID controller has enterprise firmware optimisations, including:
-
Onboard DRAM caching
-
Queue management tuned for consistent small-block I/O
-
Battery-backed cache for safety and burst throughput
-
These enhancements benefit sequential + random write-heavy workloads typical of WAL and RocksDB.
3. Separation of Concerns
-
WAL and DB I/O patterns are different (WAL = sequential write-heavy; RocksDB = random read/write).
-
Isolating them to separate SSDs avoids I/O interference, improving tail latency for both.
4. Improved Recovery & Compaction Times
-
Faster storage for WAL and DB reduces OSD startup and compaction overhead
-
Especially important when restarting OSDs or rebalancing after failure
Benchmark Insight (FIO Highlights)
-
4k random write with queue depth 16:
-
Enterprise SSD (via H730P): ~30K IOPS with <1 ms latency
-
Consumer NVMe (direct): ~50K IOPS peak, but >5 ms tail latency under load
-
Custom script to create/add NVMe-based OSDs.
- Device serial number always maps to a static name – using udev rules
- Devices always map to the same OSD number
- Each device has a dedicated WAL / Block DB in dedicated SSDs. The partition number is the same and static (mapped to device serial number) on the dedicated SSDs.
#!/bin/bash
export devs="nvme0,nvme1,nvme2"
export osds="0,1,2"
export waldbparts="1,2,3"

hostName=$(hostname)
case "$hostName" in
    server1*)
        export osds="0,1,2"
        ;;
    server2*)
        export osds="5,6,7"
        ;;
    server3*)
        export osds="10,11,12"
        ;;
    server4*)
        export osds="15,16,17"
        ;;
    *)
        osds=""
        ;;
esac

#export devs="nvme0"
#export osds="0"
#export waldbparts="1"

WALDEV=`ls -l /dev/cephdisk3 | awk '{ dev=$NF; sub(/[0-9]+$/, "", dev); print dev }'`
DBDEV=`ls -l /dev/cephdisk4 | awk '{ dev=$NF; sub(/[0-9]+$/, "", dev); print dev }'`

# Split into arrays
IFS=',' read -ra dev_arr <<< "$devs"
IFS=',' read -ra osd_arr <<< "$osds"
IFS=',' read -ra waldb_arr <<< "$waldbparts"

for counter in "${!dev_arr[@]}"; do
    OSD="${osd_arr[$counter]}"
    OSD_DEV=/dev/${dev_arr[$counter]}n1
    OSD_DISK=${OSD_DEV}p1
    METAPART="${waldb_arr[$counter]}"
    WAL_DISK=/dev/$WALDEV$METAPART
    DB_DISK=/dev/$DBDEV$METAPART

    SERVICE_NAME="ceph-osd@${OSD}.service"

    echo " "
    echo "Creating partitions - Device ${OSD_DEV}"
    parted ${OSD_DEV} --script \
        mklabel gpt \
        mkpart primary 1MiB 100%
    sleep 3

    echo " "
    echo "Creating ceph volumes..."

    echo " "
    echo "Executing ceph-volume lvm --osd-id ${OSD} create --bluestore --data ${OSD_DISK} --block.db ${DB_DISK} --block.wal ${WAL_DISK} --crush-device-class nvme"
    ceph-volume lvm --osd-id ${OSD} create --bluestore --data ${OSD_DISK} --block.db ${DB_DISK} --block.wal ${WAL_DISK} --crush-device-class nvme
    sleep 3

    echo " "
    echo "Executing systemctl start ceph-osd@$OSD.service"
    systemctl start ceph-osd@${OSD}.service
    sleep 3

    echo " "
    echo "Executing ceph osd in $OSD"
    ceph osd in ${OSD}
done
Custom script to create/add SSD-based OSDs.
- Device serial number always maps to a static name – using udev rules
- Devices always map to the same OSD number
- Each device has a dedicated WAL / Block DB in dedicated SSDs. The partition number is the same and static (mapped to device serial number) on the dedicated SSDs.
#!/bin/bash
export devs="cephdisk5,cephdisk6"
export waldbparts="5,6"
export osds=""

hostName=$(hostname)
case "$hostName" in
    server1*)
        export osds="3,4"
        ;;
    server2*)
        export osds="8,9"
        ;;
    server3*)
        export osds="13,14"
        ;;
    server4*)
        export osds="18,19"
        ;;
    *)
        osds=""
        ;;
esac

#export devs="cephdisk5"
#export osds="3"
#export waldbparts="5"

WALDEV=`ls -l /dev/cephdisk3 | awk '{ dev=$NF; sub(/[0-9]+$/, "", dev); print dev }'`
DBDEV=`ls -l /dev/cephdisk4 | awk '{ dev=$NF; sub(/[0-9]+$/, "", dev); print dev }'`

# Split into arrays
IFS=',' read -ra dev_arr <<< "$devs"
IFS=',' read -ra osd_arr <<< "$osds"
IFS=',' read -ra waldb_arr <<< "$waldbparts"

for counter in "${!dev_arr[@]}"; do
    OSD="${osd_arr[$counter]}"
    DISKNAME="${dev_arr[$counter]}"
    DEVICE=`ls -ltr /dev/${DISKNAME} | tr -s ' ' | cut -d " " -f11`
    DEVNAME="${DEVICE:0:3}"
    METAPART="${waldb_arr[$counter]}"
    WAL_DISK="/dev/$WALDEV$METAPART"
    DB_DISK="/dev/$DBDEV$METAPART"

    SERVICE_NAME="ceph-osd@${OSD}.service"

    echo " "
    echo "Creating partitions - Device ${DEVNAME}1"
    echo " "
    parted /dev/${DEVNAME} --script \
        mklabel gpt \
        mkpart primary 1MiB 100%
    sleep 3

    mkdir -p /var/lib/ceph/osd/ceph-${OSD}

    echo " "
    echo "Creating ceph volumes..."

    #Create the ceph volume
    echo " "
    echo "Executing ceph-volume lvm --osd-id ${OSD} create --bluestore --data /dev/${DEVNAME}1 --block.db ${DB_DISK} --block.wal ${WAL_DISK} --crush-device-class nvme"
    ceph-volume lvm --osd-id ${OSD} create --bluestore --data /dev/${DEVNAME}1 --block.db ${DB_DISK} --block.wal ${WAL_DISK} --crush-device-class ssd

    #Start OSD service
    systemctl start ceph-osd@${OSD}.service
    ceph osd in ${OSD}
done
After creating all ceph volumes, check the status
root@server1:~# ceph -s
  cluster:
    id: 577c09c2-c514-471a-aee1-6a0f56c83c3a
    health: HEALTH_WARN
            no active mgr
  services:
    mon: 1 daemons, quorum ceph1 (age 3h)
    mgr: no daemons active
    osd: 20 osds: 20 up (since 16s), 20 in (since 33s)

  data:
    pools: 0 pools, 0 pgs
    objects: 0 objects, 0 B
    usage: 0 B used, 0 B / 0 B avail
    pgs:
root@server1:~#
root@server1:~# ceph osd tree
ID CLASS WEIGHT   TYPE NAME STATUS REWEIGHT PRI-AFF
-1       22.92043 root default
-3        5.26396     host server1
0 nvme    1.91699 osd.0 up 1.00000 1.00000
1 nvme    1.00729 osd.1 up 1.00000 1.00000
2 nvme    1.00729 osd.2 up 1.00000 1.00000
3 ssd     1.00729 osd.3 up 1.00000 1.00000
4 ssd     0.32509 osd.4 up 1.00000 1.00000
-7        5.87335     host server2
5 nvme    1.91699 osd.5 up 1.00000 1.00000
6 nvme    1.00729 osd.6 up 1.00000 1.00000
7 nvme    1.00729 osd.7 up 1.00000 1.00000
8 ssd     0.97089 osd.8 up 1.00000 1.00000
9 ssd     0.97089 osd.9 up 1.00000 1.00000
-10       5.90976     host server3
10 nvme   1.91699 osd.10 up 1.00000 1.00000
11 nvme   1.00729 osd.11 up 1.00000 1.00000
12 nvme   1.00729 osd.12 up 1.00000 1.00000
13 ssd    1.00729 osd.13 up 1.00000 1.00000
14 ssd    0.97089 osd.14 up 1.00000 1.00000
-13       5.87335     host server4
15 nvme   1.91699 osd.15 up 1.00000 1.00000
16 nvme   1.00729 osd.16 up 1.00000 1.00000
17 nvme   1.00729 osd.17 up 1.00000 1.00000
18 ssd    0.97089 osd.18 up 1.00000 1.00000
19 ssd    0.97089 osd.19 up 1.00000 1.00000
root@server1:~#
Configure monitor services in ceph2 and ceph3 to have three monitor nodes.
Log in to ceph1 and update the monitor map to include ceph2 and ceph3 as monitor nodes.
FSID=$(grep "^fsid" /etc/ceph/ceph.conf | awk {'print $NF'})
monmaptool --add ceph2 10.0.4.2 --fsid $FSID /etc/ceph/monmap
monmaptool --add ceph3 10.0.4.3 --fsid $FSID /etc/ceph/monmap
Update the [global] section of /etc/ceph/ceph.conf file to reflect the new monitor nodes.
[global]
cluster_network = 10.0.5.0/24
public_network = 10.0.4.0/24
fsid = 577c09c2-c514-471a-aee1-6a0f56c83c3a
mon host = 10.0.4.1,10.0.4.2,10.0.4.3
mon initial members = ceph1,ceph2,ceph3
Copy the generated map and configuration files to other nodes
scp /etc/ceph/ceph.conf /etc/ceph/monmap ceph2:/etc/ceph/
scp /etc/ceph/ceph.conf /etc/ceph/monmap ceph3:/etc/ceph/
scp /etc/ceph/ceph.conf /etc/ceph/monmap ceph4:/etc/ceph/
ssh ceph2 "chown ceph:ceph -R /etc/ceph"
ssh ceph3 "chown ceph:ceph -R /etc/ceph"
ssh ceph4 "chown ceph:ceph -R /etc/ceph"
On each of the new monitor nodes (ceph2 and ceph3)
- Log in (SSH) into the node
- A default data directory on the monitor host
- Populate the monitor daemon with the monitor map and keyring
- Enable messenger v2 protocol
export NODENAME=ceph2
mkdir /var/lib/ceph/mon/ceph-$NODENAME
ceph-mon --cluster ceph --mkfs -i $NODENAME --monmap /etc/ceph/monmap --keyring /etc/ceph/ceph.mon.keyring
chown ceph:ceph /etc/ceph/ceph.*
chown -R ceph:ceph /var/lib/ceph/mon/ceph-$NODENAME /var/lib/ceph/bootstrap-osd
systemctl enable --now ceph-mon@$NODENAME
ceph mon enable-msgr2
ceph config set mon auth_allow_insecure_global_id_reclaim false
On each of the manager nodes (ceph1, ceph2, ceph3, ceph4)
- Log in (SSH) into the node
- Create a default data directory on the manager host
- Create an authentication key for the manager daemon
- Enable the daemon to start on host startup
NODENAME=ceph1
mkdir /var/lib/ceph/mgr/ceph-$NODENAME
ceph auth get-or-create mgr.$NODENAME mon 'allow profile mgr' osd 'allow *' mds 'allow *'
ceph auth get-or-create mgr.$NODENAME | tee /etc/ceph/ceph.mgr.admin.keyring
cp /etc/ceph/ceph.mgr.admin.keyring /var/lib/ceph/mgr/ceph-$NODENAME/keyring
chown ceph:ceph /etc/ceph/ceph.mgr.admin.keyring
chown -R ceph:ceph /var/lib/ceph/mgr/ceph-$NODENAME
systemctl enable --now ceph-mgr@$NODENAME
At this stage, OSD daemons are up; three monitor daemons are up
root@server1:~# ceph -s
  cluster:
    id: 577c09c2-c514-471a-aee1-6a0f56c83c3a
    health: HEALTH_OK

  services:
    mon: 3 daemons, quorum ceph1,ceph2,ceph3 (age 83s)
    mgr: ceph1(active, since 39s), standbys: ceph2, ceph3
    osd: 20 osds: 20 up (since 11m), 20 in (since 11m)

  data:
    pools: 1 pools, 1 pgs
    objects: 2 objects, 1.4 MiB
    usage: 2.0 TiB used, 21 TiB / 23 TiB avail
    pgs: 1 active+clean
root@server1:~#
Setting CPU and RAM limits for OSD daemons (Repeat in all servers)
How much to reserve is unknown. Start with some values based on availability/affordability.
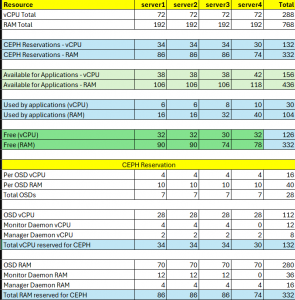
Reserving resources for OSD services
sudo mkdir -p /etc/systemd/system/ceph-osd@.service.d
Create a file /etc/systemd/system/ceph-osd@.service.d/osd.conf with the following contents
[Service]
MemoryMax=10240M
CPUQuota=400%
# Clear the upstream ExecStart, then launch with your hugepage preload [ Not using hugepages for now ]
# ExecStart=
# ExecStart=/usr/bin/env LD_PRELOAD=/lib/x86_64-linux-gnu/libhugetlbfs.so.0 HUGETLB_MORECORE=yes /usr/bin/ceph-osd --id %i --foreground
Reload and restart the Ceph OSD services
sudo systemctl daemon-reload
sudo systemctl restart ‘ceph-osd@*’
Reserving resources for monitoring services
sudo mkdir -p /etc/systemd/system/ceph-mon@.service.d
Create a file /etc/systemd/system/ceph-mon@.service.d/monitor.conf with the following contents
[Service]
MemoryMax=8192M
CPUQuota=400%
Reload and restart the ceph-mon services
sudo systemctl daemon-reload
sudo systemctl restart ‘ceph-mon@*’
Setting CPU and RAM limits for Manager daemons
sudo mkdir -p /etc/systemd/system/ceph-mgr@.service.d
Create a file with the following contents
[Service]
MemoryMax=2048M
CPUQuota=200%
Reload and restart the ceph-mgr services
sudo systemctl daemon-reload
sudo systemctl restart ‘ceph-mgr@*’
Create crush rules for logically grouping NVME and SSD OSDs
ceph osd crush rule create-replicated nvme_rule default host nvme
ceph osd crush rule create-replicated ssd_rule default host ssd
Configure .mgr pool to use NVME storage
ceph osd pool set .mgr crush_rule nvme_rule
Calculate placement group size (pg_num) for nvme and SSD storage pools. I plan to create the following five pools on nvme storage, with replication set to 3
For RBD
nvmepool
For Rados GW (S3 storage for snapshotting etcd when using RKE2 and other S3 needs)
rgw.buckets.data
rgw.buckets.index
rgw.buckets.log
rgw.control
I have 9 NVMe-based OSDs, so pg_num = (9 x 100/3 x 5) = 60, rounded off to 64 [ 3 is replication, 5 is pool count ]
Create OSD pools associated with NVME.
# 1) RBD
ceph osd pool create nvmepool 64 64 replicated nvme_rule --size=3
ceph osd pool application enable nvmepool rbd
rbd pool init nvmepool
ceph osd pool set nvmepool pg_autoscale_mode off
ceph osd pool set nvmepool pg_num 64
ceph osd pool set nvmepool pg_num_min 64
ceph osd pool set nvmepool pg_num_max 64

# 2) buckets data (objects)
ceph osd pool create rgw.buckets.data 64 64 replicated nvme_rule --size=3
ceph osd pool application enable rgw.buckets.data rgw

# 3) buckets index (metadata)
ceph osd pool create rgw.buckets.index 64 64 replicated nvme_rule --size=3
ceph osd pool application enable rgw.buckets.index rgw

# 4) buckets log (optional logging)
ceph osd pool create rgw.buckets.log 64 64 replicated nvme_rule --size=3
ceph osd pool application enable rgw.buckets.log rgw

# 5) control (internal RGW control messages)
ceph osd pool create rgw.control 64 64 replicated nvme_rule --size=3
ceph osd pool application enable rgw.control rgw
while [ $(ceph -s | grep creating -c) -gt 0 ];do echo -n .;sleep 1; done
Create OSD pools associated with SSD
I have 8 SSD-based OSDs, so pg_num = (8 x 100/3 x 1)  = 533, rounded off to nearest power of 2, 256 [ 3 is replication, 1 is pool count ]

ceph osd pool create ssdpool 256 256 replicated nvme_rule --size=3
while [ $(ceph -s | grep creating -c) -gt 0 ]; do echo -n .;sleep 1; done
ceph osd pool application enable ssdpool rbd
rbd pool init ssdpool
ceph osd pool set ssdpool pg_autoscale_mode off
ceph osd pool set ssdpool pg_num 256
ceph osd pool set ssdpool pg_num_min 256
ceph osd pool set ssdpool pg_num_max 256

Optional testing [ Create a block device and mount it locally ]

rbd create --size 10G --pool nvmepool nvmerbd
rbd map nvmerbd --pool nvmepool

# (Change the device name if a different one gets created)

mkfs.ext4 /dev/rbd0
mkdir /root/test
mount /dev/rbd0 /root/test
Enable ceph-mgr-dashboard; create an administrator user account to access the dashboard
Create a text file with the administrator password to be used (in this case I had created dbpass.txt)
ceph mgr module enable dashboard
ceph config set mgr mgr/dashboard/ssl false
ceph dashboard ac-user-create admin -i dbpass.txt administrator
Now access http://ceph1:8080
TODO: CPU Pinning for Ceph-OSD
In all servers
NUMA:
  NUMA node(s): 2
  NUMA node0 CPU(s): 0,2,4,6,8,10,12,14,16,18,20,22,24,26,28,30,32,34,36,38,40,42,44,46,48,50,52,54,56,58,60,62,64,66,68,70
  NUMA node1 CPU(s): 1,3,5,7,9,11,13,15,17,19,21,23,25,27,29,31,33,35,37,39,41,43,45,47,49,51,53,55,57,59,61,63,65,67,69,71
Update /etc/systemd/system/ceph-osd@.service.d/osd.conf with the following
[Service]
# cgroup limits
MemoryMax=10240M
#CPUAccounting=true
CPUQuota=400%
# Clear the upstream ExecStart, then launch with your hugepage preload
ExecStart=
ExecStart=/usr/bin/numactl --membind=0 --physcpubind=0,2,4,6 env LD_PRELOAD=/lib/x86_64-linux-gnu/libhugetlbfs.so.0 HUGETLB_MORECORE=yes /usr/bin/ceph-osd --id %i --foreground
Explanation
-
--membind=0: Allocates memory (hugepages) only from NUMA node 0 -
--physcpubind=0,2,4,6: Pins the OSD to physical CPUs 0,2,4,6