Bring up 5 Vms and in each VM update /etc/hosts with following entries (to match requirements)
10.1.1.5        db1
10.1.1.6        db2
10.1.1.7        db3
10.1.1.10       haproxy1
10.1.1.11       haproxy2
Install mariadb in db1, db2 and db3. Install net-tools also, netstat would be handy for some checks. Stop mariadb service.
apt install mariadb-server net-tools
service mariadb stop
Edit /etc/mysql/mariadb.conf.d/50-server.cnf and update bind address configuration
[mysqld]
…
…
bind-address            = 0.0.0.0
Edit /etc/mysql/conf.d/galera.cnf and update cluster configurations as follows. Note : The last section “node configuration” needs to be updated differently for each node. The one given below was done in ‘db1’
Note : Innodb specific configurations are specific to my setup where mariadb instances are deployed on dedicated VMs with 4 vCPU and 24G RAM. Hard disk is a partition on RAID 10 cluster.
[mysqld]
binlog_format=ROW
default-storage-engine=innodb

#Innodb specific configurations
innodb_buffer_pool_size=17179869184
innodb_log_file_size=536870912
innodb_log_files_in_group=8
innodb_flush_method=O_DIRECT
innodb_thread_concurrency=10

aria_pagecache_buffer_size=4294967296
aria_sort_buffer_size=2147483648

bind-address=0.0.0.0

#Galera Provider Configuration
wsrep_on=ON
wsrep_provider=/usr/lib/galera/libgalera_smm.so

#Galera Cluster Configuration
wsrep_cluster_name="test_cluster"
wsrep_cluster_address="gcomm://10.1.1.5,10.1.1.6,10.1.1.7"

#Galera Synchronization Configuration
wsrep_sst_method=rsync

#Galera Node Configuration
wsrep_node_address="10.1.1.5"
wsrep_node_name="db1"
Galera can make use of four ports:
3306For MySQL client connections and State Snapshot Transfer that use themysqldumpmethod.4567For Galera Cluster replication traffic. Multicast replication uses both UDP transport and TCP on this port.4568For Incremental State Transfer.4444For all other State Snapshot Transfer.
Before proceeding if there are any firewalls enabled, (not in my case) you may need to enable/allow tcp traffic on ports 3306, 4567, 4568 and 4444. Also allow udp traffic on port 4567.
The way we have configured our cluster, each node that comes online tries to connect to at least one other node specified in its galera.cnf file to get its initial state. So we need to make use of the special script to be executed to start Mariadb in first node
db1$ sudo galera_new_clusterAfter Mariadb service starts you can verify that the cluster size is one (at this moment only on node has come up)
db1$mysql -u root -p -e "SHOW STATUS LIKE 'wsrep_cluster_size'"Pasword:+------------------------+-------+| Variable_name | Value |+------------------------+-------+| wsrep_cluster_size | 1 |+------------------------+-------+db1$
Now you can start Mariadb in db2 and db3 with
systemctl start mariadb
Verify that clustering works – check for cluster size, perform db operations in any of the db1 instance and verify it is updated in other instances.
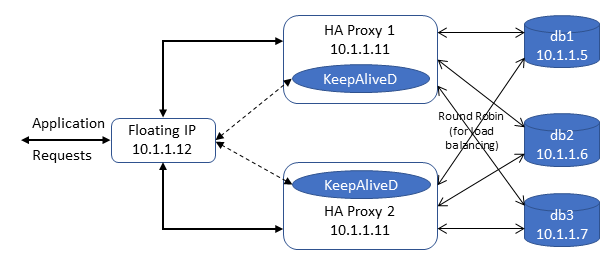
Now Let us configure haxproxy1 and haproxy2 where we configure the sql requests recieved in port 3306 is forwarded to each db instance in a round robin manner (configurable with least conn options too, scope of this article is simple how to).
In haproxy1 and haxproxy2 install haproxy (of course better to install net-tools too)
#apt install haproxy net-tools -y
#service haproxy stop
Edit /etc/haproxy/haproxy.cfg and update the contents as follows
global log /dev/log local0 log /dev/log local1 notice chroot /var/lib/haproxy stats socket /run/haproxy/admin.sock mode 660 level admin expose-fd listeners stats timeout 30s user haproxy group haproxy daemon# Default SSL material locationsca-base /etc/ssl/certscrt-base /etc/ssl/private# Default ciphers to use on SSL-enabled listening sockets.ssl-default-bind-ciphers ECDH+AESGCM:DH+AESGCM:ECDH+AES256:DH+AES256:ECDH+AES128:DH+AES:RSA+AESGCM:RSA+AES:!aNULL:!MD5:!DSS ssl-default-bind-options no-sslv3defaults log global mode http option httplog option dontlognull timeout connect 5000 timeout client 50000 timeout server 50000 errorfile 400 /etc/haproxy/errors/400.http errorfile 403 /etc/haproxy/errors/403.http errorfile 408 /etc/haproxy/errors/408.http errorfile 500 /etc/haproxy/errors/500.http errorfile 502 /etc/haproxy/errors/502.http errorfile 503 /etc/haproxy/errors/503.http errorfile 504 /etc/haproxy/errors/504.http listen galera_cluster bind 0.0.0.0:3306 mode tcp option tcplog option mysql-check user haproxy_check balance roundrobin server db1 10.1.1.5:3306 check server db2 10.1.1.6:3306 check server db3 10.1.1.7:3306 check listen stats bind 0.0.0.0:8080 mode http option httplog stats enable stats uri / stats realm Strictly\ Private stats auth admin:admin
Verify that haproxy is able to find the configuration file
haproxy -c -f /etc/haproxy/haproxy.cfg
No start haproxy
service haproxy start
Execute the following (same command three times), you will find the output to be different since the mysql command gets executed in different instances of db in round robin fashion (Note : Had executed in haproxy1 with ip 10.1.1.11)
mysql -uroot -p<password> -h10.1.1.11 -e "show variables like 'wsrep_node_name' ;"
Now that HAProxy is configured, we need to configure keepalived to associate a VIP (10.1.1.12) to one of the haproxy instances and on detecting failures to switch the VIP to the other haproxy instance.
Install keepalived in both haproxy1 and haproxy2, and stop it too.
#apt install keepalived
#systemctl stop keepalived
Configure the keepalived configuration file /etc/keepalived/keepalived.conf in node 1 as follows. Note : interface name could change, in my case it was enp1s0, Also I have ensured that router id 103 is free to use in the network.
vrrp_script chk_haproxy {
     script "/usr/bin/pgrep haproxy"
     interval 2
 }
 vrrp_instance VI_1 {
     interface enp1s0
     state BACKUP
     priority 100
    virtual_router_id 103
    unicast_src_ip 10.1.1.10
    unicast_peer {
      10.1.1.11
    }
    virtual_ipaddress {
      10.1.1.12
    }
    track_script {
       chk_haproxy
    }
 }
Update the configuration file in haproxy1 as follows
vrrp_script chk_haproxy {
     script "/usr/bin/pgrep haproxy"
     interval 2
 }
 vrrp_instance VI_1 {
     interface enp1s0
     state BACKUP
     priority 100
    virtual_router_id 103
    unicast_src_ip 10.1.1.11
    unicast_peer {
      10.1.1.10
    }
    virtual_ipaddress {
      10.1.1.12
    }
    track_script {
       chk_haproxy
    }
 }
Now start keepalived
#systemctl start keepalived
One of the haproxy nodes will be associated with the VIP. Access mysql using the VIP – Should succeed. Now stop haproxy in the node where VIP was associated – VIP will get shifted to the other haproxy node. Try accessing mysql using VIP again and you should be able to use it.
Note : Observed that there were lots of TCP connectors in TIME_WAIT state on mariadb server side. Since all the servers and clients belong to the same local network,
#echo 10 > /proc/sys/net/ipv4/tcp_fin_timeout
The above sets the TCP finish timeout to 10 secs against the default 60 seconds.